Wednesday, March 27, 2013

Easy Pantry Organization


keepin' it real- there's a lot of stuff shoved into the pantry

We have a small pantry in our kitchen, and its contents have changed a bit over the last two years. These days, there's not much actual food in it since most of what we eat is fresh or frozen- not many canned or boxed items any more (other than what we've been eating the last month or so since the nausea took over).

I've been sorting and organizing all the closets and cupboards in the house, and once I finished the coat closet, the pantry was up next.

This was actually pretty quick and easy (in the timeline of my projects, anyway).

empty and ready to be taken apart and painted

I emptied all the stuff- some got thrown away, some went to the basement with the other food storage items, and some got set aside to go back in to the pantry. Then I removed the shelves and carefully pulled the 1x2's off the wall that supported the shelves.

I used some spackle to fix the spots where the 1x2's were attached, then sanded the spots when they dried. Next up was a couple coats of white paint to cover the super dingy builders beige on the walls and door and the dingy shelves.

painted and shelves back in

I installed my favorite shelf strips that I've used all over the house so the shelves would be adjustable. One thing I did that I shouldn't have was that I cut the boards down a little before I installed the shelf strips. I ended up over-estimating how much I needed to cut off and now the shelves are a teensy bit narrow- if they're bumped around too much, they'll fall off the supports. Oops. I'm contemplating spacer options to keep the shelves centered on the supports.

adjustable shelves!

Once that was all done, I was ready to get everything moved back in. I started at the floor and moved upward, so the vegetable bin was first. I added some screws to the side to hold the white plastic bin. We ditched paper towels years ago and use wash rags in the kitchen instead. I like them to be able to dry out and not stay damp, and this trash bin from IKEA works great. Under that I put an insulated tote.

Our  crockpots have migrated from cupboard to cupboard as I've tried to find a good spot, so they got the lowest shelf. The bowls were taking up a lot of space in one of the other cupboards and always had things piled on top of them, so they got the next shelf.

The next shelf ended up being full of miscellaneous items: jars for broth and their lids, LMS's piggy bank and penny jars, and some snacks for LMS. The shelf above got the attachments for the KitchenAid mixer, the popsicle molds, and the juicer. They'd all been crammed in other cupboards and weren't very accessible before. The very top shelf (that you can't see) ended up with a few other things like food containers (for foods we can't currently eat) and a cooler for Mr M's lunches.

I replaced the wire basket and hook on the door and I was done!


Sooo much better. And if we need to move things around, it'll be easy to move the shelves to accommodate the items we want to place on them.

Tuesday, March 26, 2013

Wood Vegetable Bin


I've been wanting a bin to store our non-refrigerated veggies (onions, squash, potatoes if we ate them, etc) in for awhile now.

I was stashing some in a basket in the coat closet, some on the counter, some in a basket in the pantry, pretty much wherever there was a little bit of space. This tended to cause problems when I needed something and couldn't remember exactly where I'd stashed it.

Anyway, since I emptied the coat closet and dedicated it strictly to coats, boots, and other things that actually belong in a coat closet, I needed to come up with a better storage option for the veggies.

I knew I wanted something open on the front, with a tilted lip to keep things in. I vaguely remembered seeing something along those lines on AnaWhite.com, and after some searching I found it here.


It wasn't quite what I wanted, since I wanted the bins stacked on top of each other instead of next to each other, but I realized I could easily change it to suit my needs.

I knew it was going to go in the pantry, so I measured the width of the pantry and made the bin half as wide, which would leave space for other things in the pantry. I also measured how deep the pantry is and used that to determine the depth of the bin. I wanted it about 34" tall, so I used that when I drew it all out and figured out the measurements of everything.

I used wood I had on hand: a 1"x12" board (10' long, I think?), several 1"x2"s, and a 1"x3" board.

I wanted good ventilation, so I used the 1x2s for part of the sides and the back, as well as to add "feet" to the bottom. I only had the one 1"x12" and I didn't want to buy any more and I wanted to start using some of the huge stash of random wood pieces sitting in the shed, so the 1x2s worked out great.


I actually cut all the pieces about a week before I ended up putting it together, which did result in a few things that I would have done a little differently if I'd been cutting it and putting it together at the same time. I think it still turned out fine, though- definitely useable as-is.


I used Gorilla wood glue and my handy dandy nail gun to put it all together. I think it took maybe half an hour? Since it's going in the pantry, where it won't be seen, I decided to leave it unpainted. So nice to have a project finished so quickly!


I'm gradually getting the kitchen more organized and more functional, and I love it! I hate having to dig through stacks of stuff to find the item I'm looking for, which is invariably on the bottom/at the back.

I'll show you tomorrow where this bin is now- more things getting organized!

Monday, March 25, 2013

Bifold Closet Doors Deconstructed


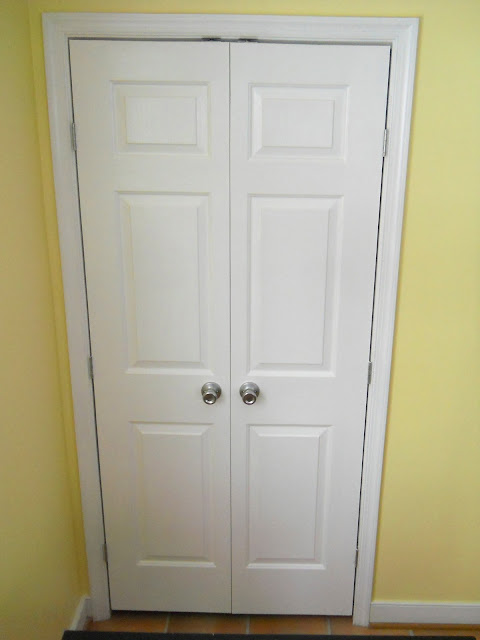
I mentioned last week in my post about our coat closet that I'd done some work on the closet doors, and here's how they turned out.

Our kitchen coat closet had bifold doors that were driving us nuts. The hinge thingy at the top broke and we replaced it, then it broke again. Yes, we could keep replacing the silly thing, the piece doesn't cost much, but it's super annoying. And I strongly dislike bifold doors anyway. They're almost as bad as those sliding closet doors that never allow you to see the whole closet at one time.

After months of living with the doors leaning against the frame, exposing all the clutter, or precariously leaning against the clutter, mostly hiding it, I finally got to work on it. (I thought I took a picture of the doors leaning, but apparently not)

I took off all the hardware that was on it originally and removed the slider track at the top of the door frame. Then I installed three hinges on each door- not regular door hinges since they're too big for these little doors. I also installed dummy knobs on each door and ball catches at the top to hold the doors shut.


I then removed the dummy knobs and painted both sides of each door white to cover the hated builders beige. After the paint dried I replaced the dummy knobs.

One thing I meant to do and didn't (though I may go back and do): I was going to chisel out spots on the door frame to allow for the hinges. I forgot to and ended up having to sand down the doors so they'd close better. Annoying.


In the end, it looks so much better and is so much more functional. I love it!

Hmmm, I just realized I've been using that word a lot. Apparently functional is very important to me :)

Thursday, March 21, 2013

Organized Kitchen Coat Closet


For some reason the coat closet in this house is in the kitchen, not next to the front door. Admittedly, the kitchen door is the one used the most, but I still think it's awkward to have a coat closet in the kitchen.

Especially since we ended up cramming all sorts of stuff into it: coats, hats, boots, bins with misc. items, shelves with linens and cleaners and onions, the vacuum and broom, cans of paint, baskets of papers to be taken care of, bags with various uses, the list goes on and on... It kind of ended up as a catch all for anything that didn't have a spot.

a pic from when we were looking at the house- the previous owners had all sorts of stuff crammed in it, too

Unfortunately I don't have a before picture showing just how much stuff we had crammed in there, but here's some of it sitting on and next to the counter. This doesn't include the coats and all the various bags.


Awhile ago I added a lower shelf and put nails in the boards to hang our coats on. The coat rod was just below the upper shelf, which is just stupid- I could barely touch it if I stood on tiptoe. I removed that since I think coat rods aren't super functional or efficient- coats are always sliding off the hangers, and there's no way LMS could reach it to hang up her own coats.

After emptying the closet I removed the lower top shelf (1x12 pine) and replaced the 1x2 supports with 1x4 supports and added a strip of 1x4s halfway down, then put the shelf back.

I also added 1x2 supports closer to the floor and put a full-depth shelf (1" cabinet grade oak plywood) on top of it. Then I cut a center divider of the same plywood. I had originally planned on putting two dividers in, but that felt too crowded, so I only did one. I used a leftover strip of plywood that had already been cut to 15" wide and I angled the top to be the same width as the shelf above. I screwed the divider into the shelf above and the shelf below, and it sits between the 1x4s, which add further support. It's all very solid.


I hadn't planned on doing anything else, then realized that adding a leg under the bottom shelf would make the front edge a lot more stable. I found a 22" leg at Lowes and cut it down to fit under the shelf. I screwed a scrap of wood to the top of it, then screwed that piece of wood to the underside of the shelf.  I wanted to use one of those metal bases that you screw to the underside and then thread the center screw in the leg into, but since I couldn't find a leg just the right length, that wasn't an option.

Adding that leg makes that lower shelf stronger, which is good since let's be realistic: that shelf WILL be climbed on. And not just by kiddos. If I stand on it I can reach stuff on the top shelf without first digging out a step stool. Yay!


The final step after painting the whole inside of the closet was to add 30 double coat hooks. Probably overkill, but honestly, I'd rather have too many hooks rather than too few. Those nails we were using before highlighted the need for plenty of hooks for coats and jackets and various bags.


The baskets above are for hats, gloves, mittens, etc- one for each of us. Or there will be when I find a fourth basket. I found three baskets at HomeGoods, but they didn't have a fourth. Now I'm scouring the local stores for a matching one since I really like these baskets.


The bags on the top shelf hold smaller bags that get used for various activities- soccer, skiing, hiking, etc.


And under that lower shelf? A perfect spot for all our boots. We were using a boot tray by the back door, but it was a squeeze to get one pair of boots for each of us on it. When you factor in rain boots, snow boots and hiking boots, there was definitely not enough space.

I will be doing another post on the doors of this closet- I'm quite pleased with how they turned out too.

I can't say enough about how much I love the coat closet now. I love getting the house organized and having a place for everything. It makes it so much easier to find things when everything has an actual home and isn't crammed somewhere in a closet. I'm working on getting all the cupboards and closets in the house organized and as I do the house feels so much more peaceful. I hate clutter and disorganization :)

Thursday, March 14, 2013

Flower Garden


I actually made this some time ago {ok, a long time ago}, and it's been sitting on the Little Miss' nightstand for at least a year. I just couldn't decide where to hang it. Now it's on the wall, and I'm not sure it'll stay in that spot. Hmmm.


Anyway, I saw the original idea hereand I even intended to do butterflies since there are some butterflies in LMS' room. But since I already made the butterfly mobile (scroll to the bottom of the page) I didn't want too many butterflies.

I'd used some cute flowers in her room in our last house, so I decided to make a flower garden instead of a butterfly garden.

I followed her tutorial (super easy!) for the wood piece and added flowers that matched LMS' room that I found at Hobby Lobby and Michaels. Since they were on wired stems, it was easy to twirl them into fun shapes.

When I made it, I used screws and wire and to make a picture hanger. In the end, though, I decided to use a 3M picture hanger (the velcro kind). I'm a bit reluctant to put holes in the walls right now, especially since we don't know yet if we'll be moving things around to make room for a crib. Using the 3M picture hangers makes it easy to move things around if I need to.

Can I say that taking good pictures of a lavender wall is not very easy?

Friday, March 8, 2013

Hanging shelf for play kitchen


Not long after I built the play kitchen for LMS for Christmas (last year), she requested a shelf that would hang above the play kitchen that she could put her dishes on. I promised her I'd make one, but then never got around to it.

This summer when I was building a couple other projects I built LMS her shelf. It was a pretty simple build and took just a few minutes to put together. I used pieces of leftover beadboard for the backing and then added trim to make it look nicer- that took longer than the build itself did.

I've realized that building stuff usually goes pretty quickly, it's the finish work- the trim, the putty/caulk, the sanding, the painting- that takes time.

That said, I still finished the shelf last fall sometime, but never got around to actually hanging it on the wall till a couple weeks ago. Yes, I am a huge slacker/procrastinator sometimes.

I think it turned out great and LMS loves it. Now she doesn't have to store her dishes in the oven- which is just not the thing to do, in her mind :)


What part of your projects takes the longest?