
Saturday I finally finished the advent calendar I've been working on all week. Half way through, I considered scrapping the whole thing because it turned out to be way more work than I thought it would be, but I'm glad I didn't. I really like how it turned out.
I used two dropcloths I had bought for another project before I changed my mind about the fabric I wanted to use. So they were just sitting in my craft cupboard, begging to be used for something. The only problem (and it turned out to be a big one) was that the drop cloths had a 'leak proof lining'. I thought that meant there was a rubberized banking. Not so much. A leak proof lining is thin plastic (slightly thicker than plastic wrap) attached to the fabric. I washed the drop cloths a couple times to soften them up and that helped loosen the plastic in some places. I started pulling off what I could, but it was very tedious and messy. I eventually called it quits and moved on with the project.
I used one cloth to cut out the squares for the pockets. I used the hemmed edges of the cloth for the top edges, eliminating the need for me to hem them. After I cut them out, I tossed them in the washer for a quick rinse cycle and then dried them. They came out nicely frayed, I just had to trim and even everything up.
I don't own a Cricut (unfortunately), so had to make my number stencils by hand. I printed out some numbers, taped the paper to a sheet of black craft foam, and cut them out with an exacto knife. I then dry brushed the numbers 1-25 on the squares with acrylic paint left over from another project. They dried quickly, and I ironed them to heat set, just to make sure.

I used Aleene's Fast Grab Tacky Glue to glue the squares in place, and let them dry over night. I would use actual fabric glue if I were to do it again, as the glue came unstuck in some places.
I had planned on machine sewing with white thread each square, but the whole thing was just way too plain and boring. So I used some red embroidery floss and did a running stitch around 3 sides of each square. I then added some little bows from a roll of three kinds of ribbon that I found at Michaels awhile ago and bought, not knowing what I was going to use it for. If I did it again, I would sew the bows on before gluing and sewing the squares to the back, though, since sewing the bows on helped loosen the glue even more.
Somewhere in there, I spent more time picking plastic off the back, making my finger tips very sore, and delaying the whole process.
After the red thread and bows, I put tiny dabs of hot glue at the top corners of each square to make sure they didn't get pulled off too easily. I also dabbed tiny dabs of glue to the bows to make sure they wouldn't come undone.

I tried sewing some red buttons on, but they just made things look busy. I like how simple it looks, so I pulled them back off.
I made the pocket for Christmas day bigger than the others, with a bigger bow. I also put a candy cane in, instead of a mini candy bar.

After all that, I made a star out of some of the yellow felt left over from LMS's princess crown and angel belt. I used lighter yellow embroidery thread on the edges, and sewed a button in the middle.

After taking out the candy for the day, the star goes in the pocket to mark the date. The pockets can hold papers, multiple candies, etc, so they're quite versatile.

After all that, I sewed a second piece of fabric to the back and some tabs on the top to hang it from. I ironed it all, and in this case, the plastic did come in handy: it acted like a bonding agent. I hemmed the bottom, and hung it from a dowel. I added some braided twine to hang it from.
It looks kind of plain on the wall right now, so I think next year, when it's hanging on our own wall, I'll have some greenery and bells just above it.


 I did the same thing with this dress that I did with the blue dress, and it turned out just as good. They were both fairly quick and easy to do, and extended the life of the dresses.
 However, I'm still debating the lace on the hem. I'm not sure I love it, but I'm afraid the skirt might be too plain if I take the lace off. Any one else have an opinion? I'd love to hear it!
 LMS likes it, and apparently it's a princess skirt- hence the fingers holding it up.
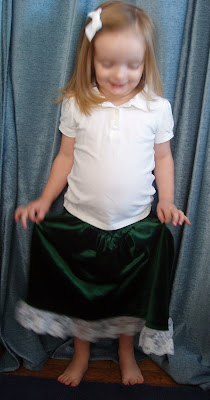 It's also a twirly skirt!
 Awhile ago, I saw a cute microsuede skirt at Target, but couldn't quite justify buying it, despite it's cuteness.


 This time I turned a shirt of mine into a jumper for LMS. I love the color of the shirt, but the cut was awful- it hung like a bag on me.

 It wasn't till I was looking at the picture on my computer that I noticed something off. Anyone else see it? I truly didn't realize it till then, either. Not while I was working on it, not while I was taking a picture...
  not nearly as nice and even, and it looks a lot worse in person.
.JPG)


 LMS has tons of clippies- way more than she needs, but I can't bring myself to get rid of any of them, since she does wear them. Just some more often than others. In any case, I was tired of the ribbons hanging on the wall- there just wasn't enough space for all the clippies. So I decided to make a board to clip them to. I'd seen similar things on other blogs and figured it wouldn't be too hard to do.
.JPG)


 The front side (can't even tell there used to be some holes):
 I then glued the two flowers to a clippy that I had already covered with ribbon. I now have some Christmas-y clippies that took maybe ten minutes to make, and were super cheap.
 Top row: Gingerbread man buttons on white grosgrain ribbon, White chenille flowers (wedding/baby ribbon section of wally world) on white grosgrain ribbon, Brown chenille flowers (same place as the white ones) on brown satin ribbon (I wanted brown velour ribbon to match one of LMS's dresses, but I haven't found any yet).


 Total cost: about $1.50


 Then cut the heels and toes off:
 I folded the middle of the foot in half and pinned it to the cut end of each sock:
 A quick
  There's ribbing on each end, so they actually stay up, and they cost a fraction of the price of