Monday, December 12, 2011

New life for a tired front door

  Here's our front door. The natural wood color just doesn't go with the rest of the house. It stands out, and not in a good way.

If you look closer you can see that not only does the door not match the rest of the house, but the varnish is worn off and the wood is not in great shape.

 Can you see the fuzzing of the exposed wood fibers? Wood is not supposed to do that. Apparently the previous owners were a little too enthusiastic with the powerwasher.

One of the projects on our list of things to do before it got too cold was to make the door look a lot nicer.
The first thing I did was sand all the fuzzies off. So much better! 

Then I primed all that exposed wood.
I had originally planned on painting the side window panels a dark blue/black to match the shutters. Once I primed it though, I really liked the white look and changed my plan. I also realized that board under the door needs to be primed and painted as well. Not sure how I missed that one...

I painted the door blue. I LOVE the color, but I'm not convinced it works with the slightly pinkish siding. I'm leaving it for now, though.  


Then I painted the side panels white, and since I had the paint out I went ahead and painted the columns and the rest of the wood trim on the porch.  The rails are vinyl, but the columns are wood. I'm thinking the previous owners did a quick and dirty fix on the porch railings before putting the house on the market. I was only able to do one coat of paint before the cold weather moved in for good. I kept hoping the weather would warm up enough for me to get a second coat on, but it never did, so I just peeled off my frog tape and put out my Christmas decorations.

In the process of painting the columns, I pulled off the navy trim pieces. For some odd reason, woodpeckers LOVE the navy wood trim and pecked holes in two of the columns, one of them repeatedly. I bought some PVC trim (maybe the woodpeckers won't like it?) and will try out some plastic fusion spray paint on it before attaching the trim to the columns in the spring.

I also stained the decking after Mr M powerwashed it.

And sometime this winter, if I have nothing else to do (hah!), I'll bring in the porch swing and paint it.

Before:

After:

What do you think of the door color?

Wednesday, November 30, 2011

Dining room to Library progress photos

When we were looking at houses to buy, one of the things we wanted was a formal dining room. We didn't want  it for a dining room- we wanted a library :)

We got what we wanted, and here's what it looked like before we bought it. Apparently I didn't take any other pics after we moved in, which is too bad, since the stacks of books were quite impressive.

Another view of the library from before we bought the house.

I finally got around to painting the library not too long ago. I went with a sand color, which is a bit grayer than the hideous builders beige that STILL (12 years after being built) covers almost all the walls (and the ceilings) in this house. My mission this winter is  to paint every surface in this house :)
These pics show the top half of the room painted, with the bottom still the original color. The new paint highlighted how grungy the old paint has gotten.

The ceiling is now white, the wall sand, and all the trim got a white touch up as well.

I still need to hang the picture on the wall and recover the brown chair (and finish the blue chair) and fix the top of the sewing table since I'm not loving the lacy tablecloth look. I also need to figure out what to do about curtains. I haven't yet found any fabric I love, so the windows are still unadorned.

See that empty wall? That's where the built in shelves will be for all our books. The piano is a recent craigslist acquisition- we got a great deal on it! We also need to move a cupboard into the room to put the musical instruments in so they aren't sitting in one of the chairs.

I will hopefully get the bookshelves built by Christmas, but in the meantime I wanted to show the progress I've made so far.

Tuesday, November 29, 2011

Farmhouse dining table

We have a perfectly serviceable dining table that we bought 8 or 9 years ago at a scratch and dent sale for $125. It came with 5 chairs, not the usual 4 or 6, but we weren't complaining. We had a real dining table instead of the glorified cardtable (a square, tile-topped wood table) that we had bought when we first got married. That table was actually a bit big for our first apartment, which tells you how small that was, but when we went to language school and lived in a real house that had an actual dining room, the table looked rather pathetic.

However, I've never really liked the finish of the table- a bit orangey for my taste, and the carving looks sloppy IMO. Ana White posted some plans for a farmhouse table awhile ago and I realized I could make us a new dining table. I'd already figured out what I wanted to do with the old one when it was replaced, but I couldn't do that till we had a new dining table.

Can I tell you how much I like Ana White's site and the myriad plans that are available? And it's so easy to alter them to fit your needs. The original farmhouse table plans are for an 8 foot table. We don't have room in our eat-in kitchen for an 8 foot table, so I cut the plans down to 6 feet long and started building.

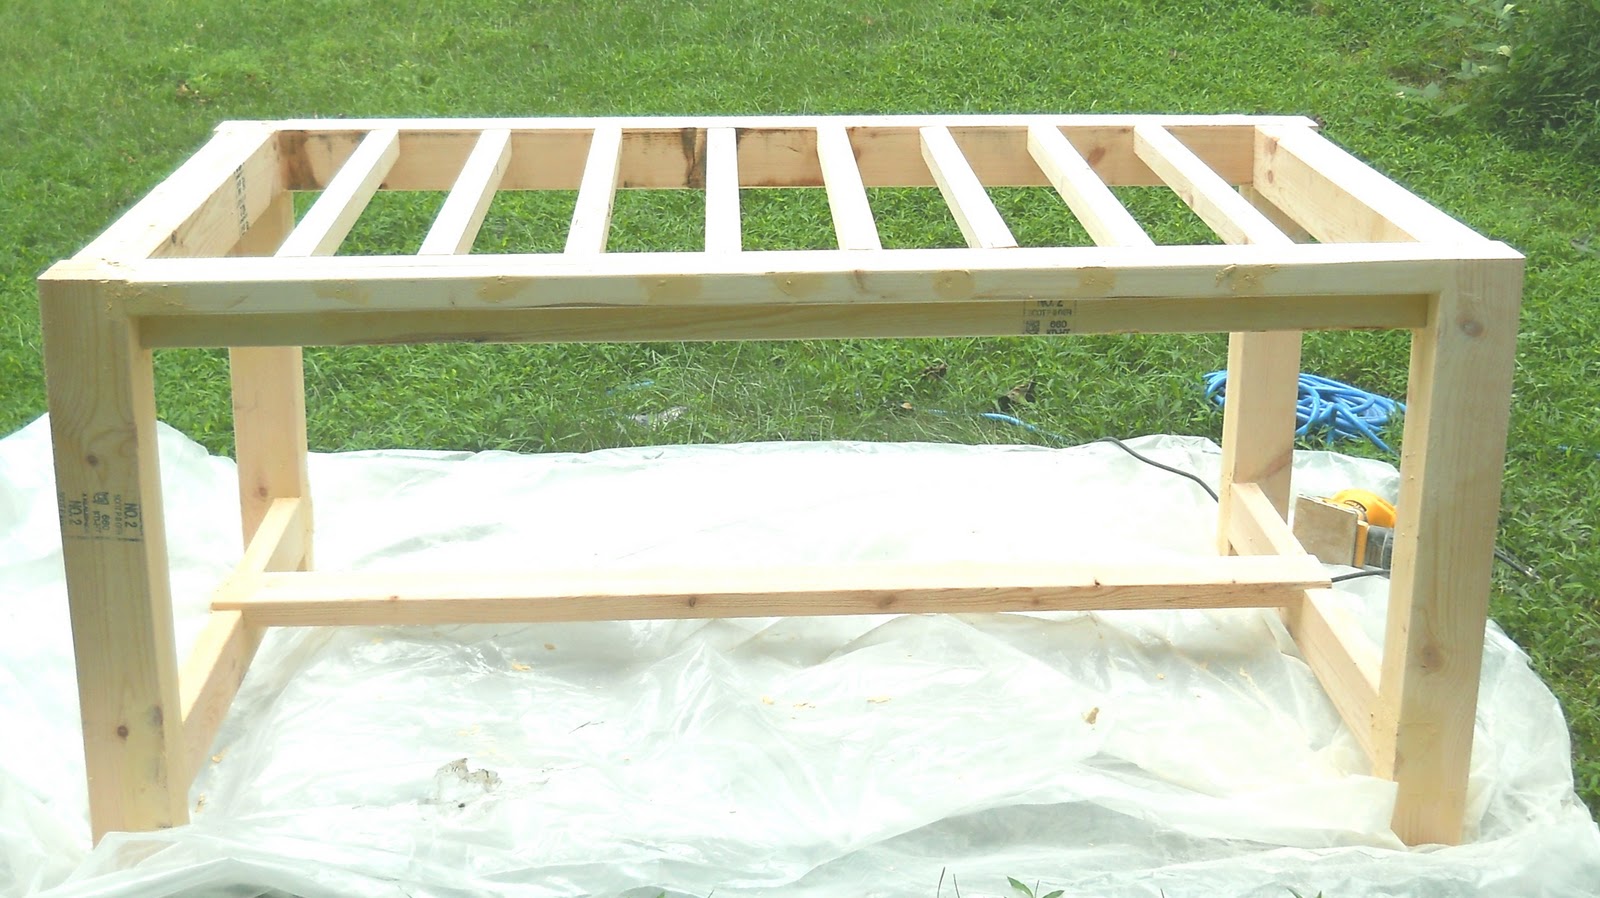
Here's the frame:

After sanding the wood puttied screw holes, I primered the frame and then painted it a dark gray. I then pained a couple coats of white on top of that in preparation for some distressing.

I attached the table top, then did lots of sanding. LOTS of sanding. There was enough difference in the height of each board that the palm sander couldn't handle it all. We ended up getting a belt sander (which we needed anyway), which made fairly quick work of leveling the surface. After sanding with a rough sanding belt I switched it for a smoother sanding belt and sanded the whole thing again. After that, I used the palm sander again, and by then it was nice and smooth.

Table top on:

I fixed the wood putty, sanded it again, then applied wood conditioner and stain.
I was a little apprehensive about using a black stain, but I think it turned out pretty good.

Table top stained:

But, I made the mistake of using the palm sander to lightly sand between coats of polycrylic:
When they say 'lightly sand', they mean lightly sand by hand. Somehow I missed that one...
The spot wouldn't take more stain, and it was pretty obvious, so it had to be fixed.

So, I stripped the table top:

And sanded it again before re-staining and applying polycrylic properly:

I built it downstairs in the basement and Mr M helped me carry it outside for the sanding, but this table weighs a TON. I knew there was no way we could get it upstairs by ourselves. Luckily our home teachers were willing to help us move it, so it was much more manageable.

The finished table:

The chairs do detract from it, but that's just because I haven't had time to refinish them yet. I'll be painting the wood and changing the fabric and finally getting rid of the vinyl that's been covering the seats since LMS started eating solid food. Not sure why I wanted to protect the upholstery, but there you go.

I'll also be building these benches to go on the sides. The three chairs on the sides will find homes in other parts of the house.


Next up:
Pictures of what I did with the old dining table.

Thursday, November 24, 2011

Project progress

Saturday we got a lot of work done, and it's nice to actually see the progress.

Mr M tilled up the spot where we're putting in our garden next spring. There's tons of rocks in the ground here, so he has more work to do still unfortunately.

While he was doing that, I finished clearing the leaves. After raking and bagging 20+ bags of leaves from just a couple trees last year, we decided to take the easy way out and get a leafblower this year. Totally worth the money! I cleared the driveway and parking area Friday and all the grassy areas Saturday. So much quicker (and easier on the body) than raking and bagging. It's nice not to have to get rid of all those bags of leaves- I just blew them into the underbrush and trees that surround the house and lawn- there will be more mulch in the woods come spring.

Side deck, not powerwashed yet 

Mr M was finally able to finish powerwashing the back deck while I stained the side and front porches. We still have to stain the back deck next week. I can see why the previous owners didn't keep the decks clean and sealed- it's a lot of work, and you have to have the time to work on it when the weather is cooperating (which hasn't been the case lately). We can't wait till we can afford to replace the high maintenance wood with low maintenance Trex-type decking.
Side deck, powerwashed and stained

When we re-do the decks we're going to screen in part of the back porch. We had a screened-in back porch at our last house, and it's a lifesaver in the summer. There's so many bugs here that we end up staying inside to avoid them. It'd be nice to be able to spend more time outside.

In the meantime, it feels good to be making progress on the myriad projects that need to be taken care of around the house.  Ahhh, the joys of homeownership :)

Wednesday, November 9, 2011

Our Halloween Costumes

I was editing the Halloween costume pics when I realized I didn't get a picture of the back of LMS' costume. Since I'm particularly pleased with how it turned out, I had to wait for a sunny day and reshoot the costume pics. And then I had to wait till I had some spare time to edit the photos before adding them to the post. So, a week and a half after Halloween, here's my costume post :)


Little Miss Sunshine dressed as Princess Leia. She wanted to be a princess again, and I managed to direct her in a direction other than the Disney variety :) She's seen the original three movies, so she knows who Princess Leia is and was ok with being her instead of Belle (I sooo did not have time to sew Belle's yellow ball gown this year).

I was Upper GI and Mr M was Lower GI- a fun idea I found online that worked out well- all we had to do was dig out an old uniform and make name tags.

 You can't see my name tag, so here's the tags we pinned to our shirts.
I used my silhouette to cut the black cardstock for the back and the cream vinyl to go on top.


I followed ideas found here and here and used pictures from here. I drew an outline around LMS (with her laying on some newsprint) and used that as the pattern for the dress. I used a synthetic fabric (nylon or polyester something, I don't remember for sure) that has a really nice drape to it. I cut two of everything so the dress had a self lining. A rectangle formed the hood and was attached to the neckline with pleats. I put a zipper in the back and used some stiff interfacing to help the collar keep its shape. I then sewed some silver lame on some white canvas to make the belt, which also has velcro on the ends to close it.

I bought a skein of yarn and a costume wig and played with some ideas for the cinnamon buns. The wig didn't work because it didn't have a center part in the back and because I couldn't touch the nasty fake hair for longer than 5 seconds without being completely icked out. Have you ever touched the fake hair in a cheap wig? Yech! Anyway, I carefully cut the hair off the wig base and then sewed yarn to it with a center seam for the part. Using the wig base definitely made the whole thing so much easier. I then gathered the yarn and twisted it into cinnamon buns and sewed them in place with some yarn. It's not perfect, but it's good enough and definitely recognizable for what it is :)
  I really like how the hood turned out :)


Isn't she cute?

Wednesday, October 26, 2011

Quick and easy stickers for the ukulele (Silhouette project)


LMS loves her pink ukulele, but so do the other 3 girls in the class who have pink ukuleles. This can lead to some confusion as to whose uke is whose.

We could just write her name in sharpie on the back of the neck, but where's the fun in that?

So I decided to use my Silhouette to do some personalization.

I found a hibiscus flower in the Silhouette library and cut a couple different sizes.

LMS helped me put them on, and we were done!

I had originally envisioned a white sticker on the pink ukulele, but then realized I don't have any white vinyl, so we used some dark pink instead, and I think it turned out great.
Hee hee. This is what LMS does half the time during uke class- play with the grass and flowers :)

Friday, October 14, 2011

Happy Camper shirts

Several months ago I saw some cute shirts here, that I thought would be great for our camping trip this summer. Unfortunately, I dropped the ball and didn't get the vinyl ordered in time, so it arrived the day before we left. I was so busy trying to get everything else done, there was no way I had time to figure out how to use my Silhouette, which I still hadn't used yet at that point.
I ended up making them for our trip this past weekend, though I still think they would have been great for our trip this summer. Oh well.

It did take me awhile to figure out how to use the Silhouette and the software and what order to iron everything on the shirts, but I managed to do it all with only one mishap- I forgot to flip the first 'happy' and had to redo it so it would be legible after it was ironed on.


 As I ironed all the pieces on I realized I should have picked the colors a little better- the gray "happy" on my shirt blends into the lavender shirt (this was the one I messed up on and I didn't have any more white left- black would have been better than gray) and the purple trim on LMS' shirt blends right into the black trim.

  
Despite their imperfections, I'm happy with how the shirts turned out, and I like LMS' shirt the best. I'm glad I finally took the time to figure out how to use the Silhouette. Now that I've done that, I feel confident whipping out other projects. It really is quick and easy to use, once you figure out the details, which I just never had the time to do. Doing a challenging project right off the bat really helped me learn the ins and outs, even if it did increase the chances of a disaster :)