Saturday, September 29, 2012

Master Bedroom Progress


I've been busy working on various projects around the house, but the problem with that is that none of them are quite done yet, so it's hard to show the progress I've made. I've finally done enough work on our bedroom that I can post some photos, even though the room isn't finished yet.

Apparently I'm really bad at taking before pictures, since I just searched through all my old photos and can't find any since we moved in. Here's a photo from when we looked at the house. The color in the photo looks kind of yellowish, but in person it was more apple or lime green with a cream sponge job to tone it down a little. Not terrible, but not what I'd put in a bedroom.

This is the view from the hall door. The first thing I did was take down the hideous old fan (apparently no picture of that, either, but it was very large and ugly- wood fan blades, greenish metal faux finish on the rest, ugly glass lamp shades) and paint the ceiling flat white (my favorite color for ceilings)- it really lightens the room up after the drab beige that was there. I then installed a new white fan that is much less obtrusive. In general, I don't love the look of ceiling fans, but out here they're a necessity, so we looked for the least offensive style. I then painted the walls a light blue-gray that I mixed myself from paint we had. I was able to take in a sample and get it color-matched when I needed more. I installed crown moulding and painted it semi-gloss white and touched up the trim around the windows and doors and the baseboards. I also painted the doors- closet, bathroom, and hallway, because like everything else in the house they were builders beige. I love how crisp and clean and bright the white looks!

This view is from the bathroom door, on the same wall as the hall door. We used to have the bed on the wall on the left side of the room, but we're trying different arrangements, anticipating the day we'll need room for a bassinet (not that we know when that will happen, but you know me, just being ocd and planning ahead). I don't love the bed being in front of the window, but the room does feel more roomy.

Mr M and I designed and built this bed about 7 1/2 years ago, in the parking lot of the apartment building we lived in. We got a lot of comments from the other tenants- mostly amazed that we would even try such a thing. We love it, but we have had to tweak the original design a bit. We didn't want to use bolts to hold it all together (they look ugly), but quickly realized we had to do something to keep it all together. So we went with eye hooks and cables, which turned out uglier than bolts would have been, but you know what they say about hindsight. All these years I've been meaning to make some sort of cover for the cables, but never got around to it. That is on my list of things to do to finish off our room, as is a bedskirt and nightstands. 

I'm not convinced I like the dresser/hutch combo where it is. I might move it to the other side of the bed, or get rid of it entirely, replacing it with two nightstands rather than just one. If we keep it, I'll put different knobs on the drawers and get rid of the scalloped trim on top. I think the wood works well with the log bed, so I won't paint it. At least not right away :) The blue bench that you can only see a corner of in the lower right corner of the photo is a work in progress- it needs a cushion still, and I might end up repainting it now that the walls are done- I'm not sure I like the two blues together. I'd like a rug for the floor, but haven't yet decided on color, size, etc. The green bins on the shelf are pretty close to the former color of the room, and I'll paint them eventually. I'll also change out the lamp on the dresser- I like that it's a touch lamp, but I'm not fond of how it looks. But it was a wedding present and has been useful over the years.
The white fuzzies under the bed posts are pieces of carpet that we stuck to the bottoms years ago to protect the wood floors of the house we were living in.

I love how our room is much brighter and calmer. I actually want to spend time in here now :)

Monday, August 20, 2012

It's been awhile


some of my projects waiting to be painted

All I can say is I've been busy:

We started first grade.
I've done some building.
I've been doing lots of painting- rooms and projects.
I've been chauffeuring the Little Miss to various activities.
I finally got a new laptop after putting up with my broken piece-o-crap for more than a year, but there's a learning curve- I got a MacBook Pro. I like it, but I don't have everything figured out and transferred over yet.

And, most recently, I got knocked flat by the flu.

I know, the flu in August? If it wasn't the flu, I'm not sure what it was, but according to the internet (not the most reliable of sources, but I checked several sites to see if they gave the same info), the flu consists of about 3 days of high temperature, some light-headedness, headaches, achy muscles, chills, and nausea. Sounds like what I had. The discouraging part is that it can take 1-2 weeks to recover. I have a four mile race in just under two weeks. I may be walking an entire race for the first time.

In any case, if what I had was the flu, I don't think I've ever actually had the flu before. I would remember being unable to stand up for 3 days. Thank goodness LMS kept herself occupied (audiobooks helped a lot), since Mr M was, of course, out of town for all this. {very inconvenient} Though I didn't enjoy cleaning up the mess she made while she kept herself occupied. Let's just say she had a bit too much fun with her scissors.

As I lay on the couch and tried to think coherent thoughts, I realized we do need to be a bit better prepared for things like this. Mr M is gone often enough that I can't rely on him being present the next time I'm incapacitated (which will hopefully happen never).

Some thoughts:
  • Meals in the freezer. Most of what we eat doesn't translate well into a freezer meal, but I've come up with a few meals that should freeze and reheat without sacrificing taste and texture.
  • Childcare. This is a tough one for me, given our food issues. Thankfully LMS has shown that she can handle me not being fully functional. This works as long as we're at home, but if I were to have to go the hospital (I came close- I kept taking my temperature and if it had gotten just a smidge higher I was going to go to the ER), I would need to drop her off at a friend's house. Though honestly, if I needed to go to the hospital I probably wouldn't be able to do it myself, so I would need to find someone to drive me there. The take-away on this one: make sure I have food on hand that the Little Miss can take with her should she need to be dropped off at someone's house.
  • Written notes/instructions. This would include safe food lists for the Little Miss, food prep instructions for freezer meals, emergency contact info, etc
Truthfully though, I will probably do anything and everything I can not to go to the hospital. I don't react well to most medicines, and if I had to be hospitalized overnight food would become an issue. Though actually I can partially resolve that now by calling the local hospitals and finding out how allergy friendly their kitchens are. You would hope they would be, but I'm not holding my breath on it. Even if they're allergy friendly I doubt they'd be able to handle our limited diet.

Have you had the flu?
Have you prepared for a similar situation? What did you include in your preparations?

Wednesday, August 8, 2012

Our cute new shed


the view from the back deck- isn't it so cute? just like a miniature house!

A couple months ago we finally placed an order for a shed. We don't have a garage, we have limited indoor storage, and our only outdoor storage space has been this:

Not very big (6'x8'), and not a permanent solution.

We priced sheds at several locations, including kits and prebuilt sheds. After comparing costs, time, and convenience, we decided the best route for us at this point was to buy a prebuilt shed. It wasn't that much more than the kit, and we wouldn't have to build it in triple digit heat in between all the other things we have going on. Win-win-win.

After making that decision we decided on size, style, and colors, then placed our order. Five weeks later, one corner of our yard went from looking like this: 

To this:

I don't remember the size right off, but I think it's 10'x16'?
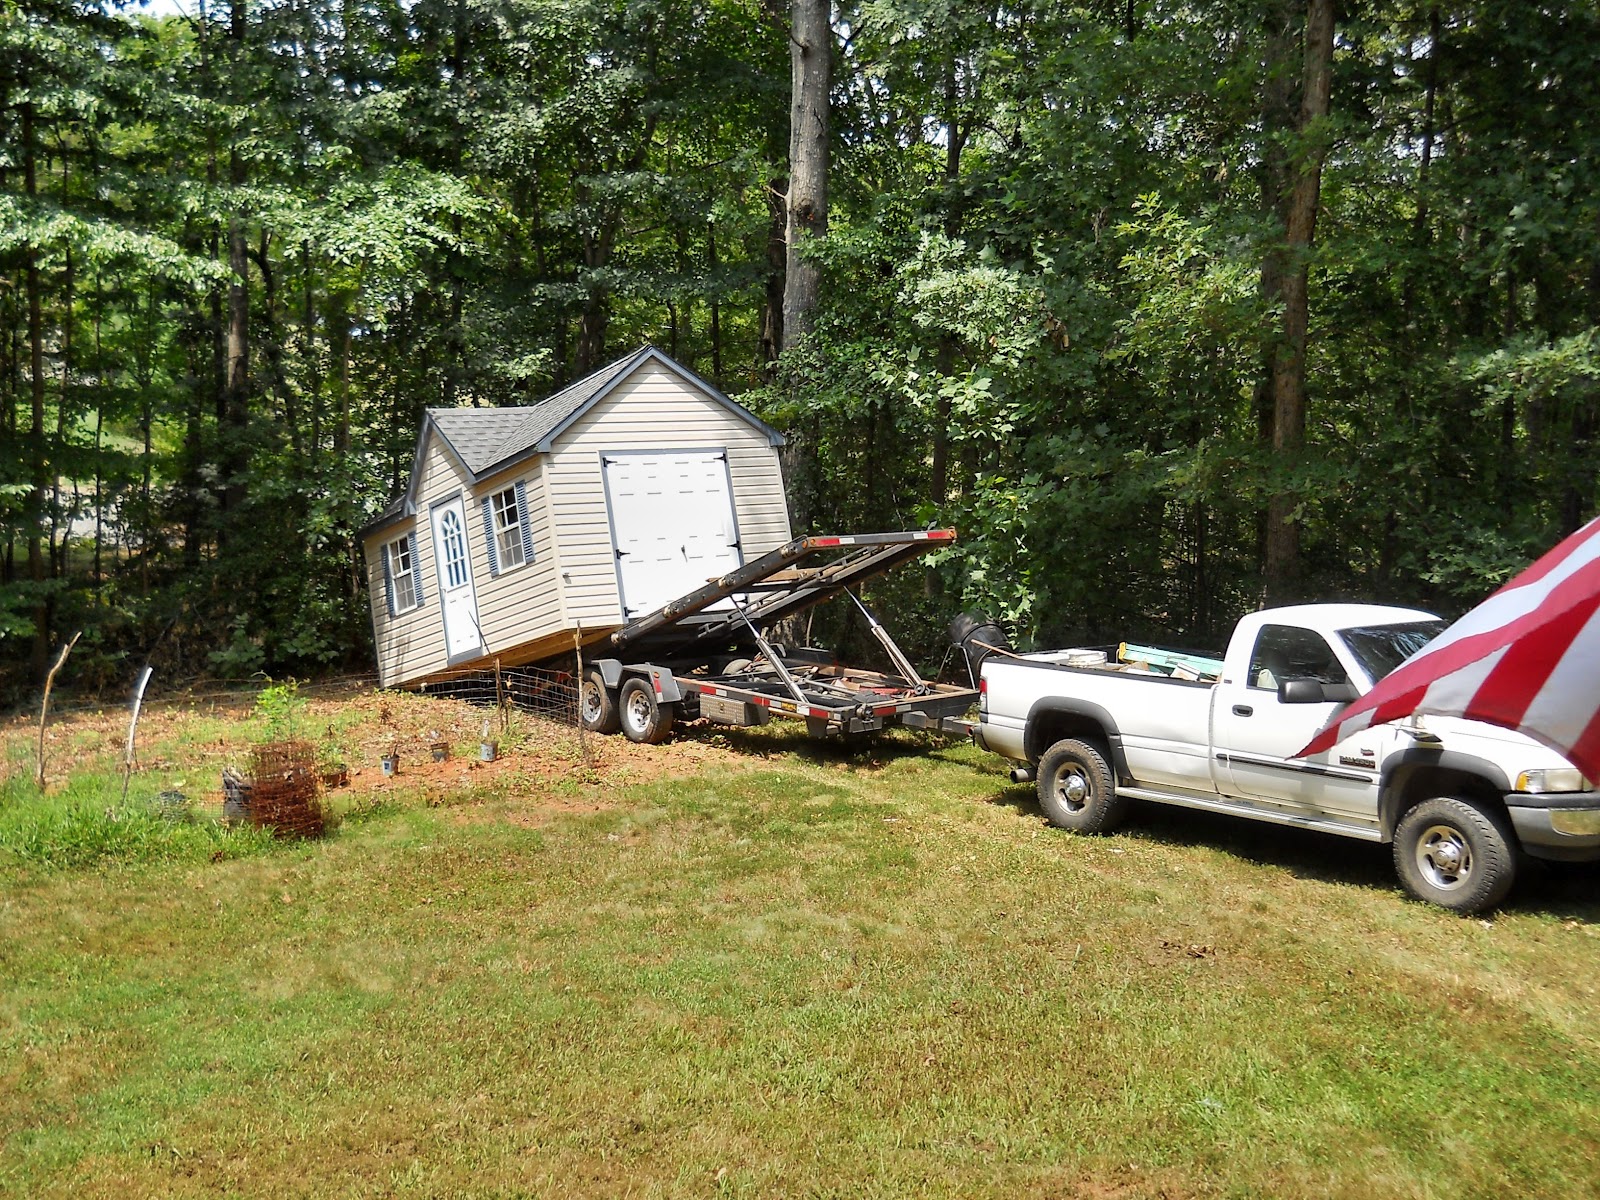
Small enough to be brought in on a trailer, but big enough to hold our stuff.

The delivery and set-up process was quite interesting to watch- part of the trailer tipped up, 

and up,

and up, 

then slid off as the truck moved forward. 


Here it's laying flat on the ground, which wasn't level, but after jacking up the shed and using quite a few blocks, 

The shed is now level. 

Amazing!
Now we need to build a small ramp below the double doors on the end, build a small step for the front door, and put some kind of trellis-y thing around the base to keep critters and such out from under the shed.


So much space- now we have to decide just how we're going to organize it as we fill it up so we can still access everything.

When we landscape the back yard, we'll dig a trench so we can run a power line out to the shed, but in the meantime we'll have to use our really long, heavy-duty extension cord.

The view from the front porch, with our stunted garden in front of the shed. Once it cools down a bit, we'll build raised beds for square foot gardening and get everything ready for spring so that we'll hopefully have better luck next year.

Monday, July 30, 2012

New Kitchen Lights


We've slowly been working on the kitchen since I removed the hanging cupboards, and last week we had an electrician come in and install can lights in our kitchen.  This was one project we didn't feel like tackling ourselves- wiring new lights wasn't something we wanted to mess around with.
Bad picture  of the old mismatched lights- I forgot to take a picture before I started changing out the lights.
The 2x4's and crown molding on the ceiling were taken down quite a while ago.

The electricians took down the large nipple light (yuck!) and put a can light there as well as four more. They also installed a box for the pendant lights over the sink.

Both the nipple light and the pendant lights also just had holes punched in the drywall and wires hanging down. I'm really not sure why they cheaped out on these, since there's lots of other details in the house that are upgrades.  Maybe it was just the electrician who did a crap job?


Holes waiting to be patched

Next up on the list: patch the holes, then finish painting the kitchen ceiling and the kitchen walls and install crown molding.

Even though it's not finished, the kitchen is already so much brighter and looks so much better. I love the light yellow on the walls- it's so cheerful.
New light over the dining table, where LMS is doing schoolwork
I'm thinking of putting some beadboard on the walls in the dining area. Not sure if I'd paint it white or light gray, though. What do you think?

Friday, July 27, 2012

Painting Progress


(the new light in the hall bathroom)
As I mentioned before, I've been painting several rooms- the kitchen, a small hallway next to the kitchen, the master bedroom, the upstairs hallway, hall bathroom, and part of the stairway.

Because they were ceiling-mounted, I replaced the lights in the kitchen, master bedroom, and upstairs hallway when I painted the ceilings. The wall-mounted hall bathroom light fixture didn't get removed till I started on all the walls.

I didn't take a picture of the old light, but it was a smaller version of the one in our bathroom
(which will also not be staying). The wall color looks quite nice in this pic, but it's actually a lime green, so the master bathroom will be painted in the near future.

I also removed the mirror to make it easier to paint everything. Once I got the light off, though, I found out that the builder cheaped out and didn't put a box in the wall- they just punched a hole and threaded the wires through it.


I carefully enlarged the hole to fit the box (after flipping the circuit breaker, first, of course- no death wishes here), threaded the wires into the appropriate spots, and installed the box. Apparently the bathroom has been repainted, but it was repainted builder's beige (why?!!) and they didn't remove the light first. So I also had to spackle the paint lines and the holes where the fixture was attached to the wall. The new fixture has a lot smaller face plate than the old one.


After two coats of paint, everything looks so much brighter and cleaner! Bye-bye grungy, scuffed-up walls, hello clean and bright ceilings and walls.

There's still more work to be done {touch up the paint where the ceiling meets the walls, paint the trim, paint the sink cabinet and medicine cabinet white, cut and install a frame around the mirror, and install a new TP holder} but I love how much better it looks already.
Every time I walk past the clean, bright walls I can't help but smile!

Sunday, July 8, 2012

So what have YOU been up to lately?


eating snow cones while waiting for the movie to start at the drive in theater

The last month we've been insanely busy:
  • Mr M had to travel for drill
  • he had a bunch of appointments and things to take care of before he could go on an overseas business trip
  • we finally finished all our adoption stuff (interviews, home visit, training, and online profile are all done- just waiting for the written approval now)
  • the usual house stuff- we finally got the last couple boxes unpacked and sorted (yay!)
  • we went on a short camping trip
  • LMS started swim lessons
  • LMS finished kindergarten
  • and the list goes on and on
I got tired all over again just typing the list. No wonder I haven't had the energy to blog lately.

Things have slowed down a smidge (finishing Mr M's stuff and the adoption stuff helped a lot), and my current project is to finally make progress painting the inside of the house. I've only painted three rooms since we moved in last spring: LMS's room, the library, and the basement rec room. That leaves the kitchen, front room, two stairways, two hallways, two bathrooms, and three bedrooms to paint. The other two bathrooms have recent paint jobs that I'm leaving for now.

Since the predominant color in our house is grungy builder's beige, except the lime green in the master bed/bath, it's important to me to get the walls looking clean and pretty. The grunge is really starting to get to me.

I've been holding off actually starting because I'm going to put paneling on the front room ceiling and we're installing can lights in the kitchen and we need to find a long ladder to do the ceiling above the stairs, all of which need to be done before the walls can be painted. I've recently realized I can move forward anyway by painting the dining part of the kitchen and working on the upstairs rooms until the ceiling stuff is finished.

Last week I spackled all the dents and little holes left by the previous owners, then I sanded and respackled where necessary, then sanded again. Spackle dust makes such a mess! I ended up working on the little hallway between the kitchen and front room, the kitchen, the stairs going upstairs, the upstairs hall, hall bath, and the master bedroom.

After the dust settled a bit I painted all the ceilings white and installed new light fixtures in the dining area of the kitchen, the upstairs hall, and the master bedroom, which makes a big impact for not a lot of money.

After two coats of flat ceiling white, I'm now ready to move on to the walls this week: "Shore" by Valspar for the small hallway, the stairway, the upstairs hall, and the hall bath. It's the same color I used in the library, and I like that it's still a light, neutral color, but with more gray than the current yellowish beige. So far it seems to go with just about any other color, which makes it very versatile. I tried other colors for the upstairs hallway and stairway, but they just weren't working, so we'll stay neutral for now. I'll use "Lemon Butter" by Valspar for the kitchen, and gray for the master bed. The gray is leftover from when the previous owners painted the front room, but it's a bit dark, so I'll add some white to lighten it up, and maybe a touch of blue as well.

We're also finishing up swimming lessons this week, which will be nice. I like the progress LMS has made, and she's got a great teacher, but it's definitely a time commitment that I'm ready to give up :)

How busy has your summer been?

Thursday, June 7, 2012

Square foot gardening


I recently read All New Square Foot Gardening by Mel Bartholomew, which I borrowed from some friends. After finishing the book, I will be buying a copy for us so we can make good use of it. Mel gives very clear instructions on how to successfully build, fill, and plant a square foot garden, as well as the reasons for why he does things that way.

We're hoping to get our yard landscaped (fill dirt brought in, yard leveled, retaining walls constructed) this fall, which is why we didn't worry too much about whether our garden worked out this spring/summer. Which is good, since it's *really* struggling. Reading about square foot gardening gave me a good idea of where to put our garden, how to organize it, and how to successfully grow produce. I think even with my propensity for killing plants I should be able to keep a garden alive and producing :)

Thinking really ambitiously, I'd like to combine square foot gardening with winter harvesting. Mel talks about extending your harvest a bit in the square foot gardening book, but I'd like to take it further, like Eliot talks about in his book. We'll need to build a greenhouse first, so we won't start the winter planting right away.

Have you tried square foot gardening or winter harvesting?